
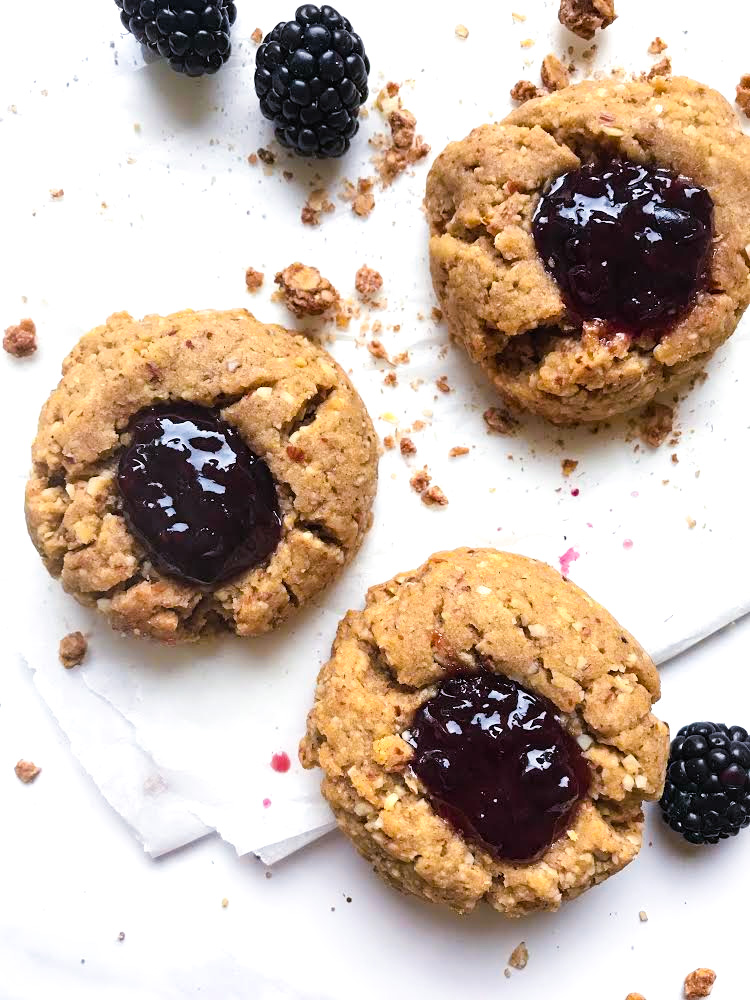

Who doesn’t enjoy jammy cookies? Like, seriously. Soft and slightly chewy- they melt-in-your-mouth and make you quickly engulf the edges so you can get to the joyous jam-filled middle. And here’s the best part; the jam-filled middle is highly customizable; I filled mine with sticky and sweet bumbleberry jam- AKA just a fancy name for a combination of strawberries, blueberries and raspberries. But it’s oh so good! These cookies are also delicious with concord grape jelly… slightly tart, and just the right amount of sweet. And if you want to take a festive turn, fill them with orange or cranberry jam for a little Christmas cheer.

Let me take you in a time-machine back to Christmas in the 90’s. Lots (and lots) of hair spray, high-waist mom jeans, and shoulder-padded sweaters with hoodies tied around your waist. My mama embodied the archetypal “Christmas Craze”. I think she prepared during January to November exclusively to shine in December. She would go blissfully overboard in turning our house into a little Christmas Wonderland. She enjoyed to decorate- (maybe) a little too much. That woman would bake on the daily; mostly orange glazed cakes, brownies, her famous strawberry trifle and sugar cookies.

Then there was music; (usually Mariah Carey, Gloria Estefan, Jose Feliciano or George Michael) and lots (read: LOTS) of ornaments, wreaths, tinsel, wooden reindeers, and her favorite: poinsettias virtually everywhere and in every color. Alright, so maybe not every color…. Just an alternation of red and white and the fake, glittery gold ones she used to stick in between. As a teenager, I remember being borderline embarrassed when people came over to our house and would muse over her love of all things Christmas. It was really, really endearing and obvious.

Looking back, I’ve got so much gratitude because I now know she only did it for us. The first Christmas I couldn’t make the long trip back home after I’d left for college, she refused to put up the tree. Scandalous! And it was there and then, as a young adult, that it hit me all at once: the dazzle and frazzle and effort and love that went into it was not due a to self-serving purpose. It was strictly for my sister and I. And to my dad, who reads my blog religiously, tell her I am super thankful for all the cheery, tacky, over-the-top decor that took so much out of her every year.

So… let’s talk about these cookies! They’re light and made with the goodness of almond flour, sweetened with pure maple syrup and stick together with the help of a little coconut oil or vanilla ghee, your pick! They’re inspired by my mom’s pineapple jammy cookies which were made with traditional flour and butter but had a jam-filled middle. They were the best! I’ve tried to recreate them using healthier, cleaner ingredients. I hope you like them, too.
They are:
- Slightly chewy & doughy, but not crumbly!
- Fully vegan because they’re egg and dairy free. Yep, you read right: no eggs or egg substitutes are needed.
- Made with unrefined sweeteners like pure maple syrup; for both the jam and the dough.
- Perfectly paleo and gluten-free thanks to grain-free almond flour! Do not sub with coconut flour.
Thumbprint Cookies
Ingredients
- 2 cups of almond flour (not almond meal) I love to use Bob’s Red Mill
- 1/4 tsp of sea salt
- 1 tsp pure vanilla extract
- 1 tsp almond extract
- 1/4 cup melted coconut oil or vanilla ghee
- 3-4 tbsp pure maple syrup (or agave)
For the bumbleberry chia jam: ( bonus: you will have plenty of leftovers to smear on toast!) This makes about 1 cup. *You’ll only need about 1/3 cup of jam for these cookies.* If you want to skip this step, simply use organic jam & opt for a “no sugar added” variety.
- 2 cups of fresh berries (blueberries raspberries and strawberries
- 1 heaping tsp of lemon zest
- 2.5 tbsp of fresh lemon juice
- 2 tbsp pure maple syrup (or agave)
- 2.5 tbsp of chia seeds
- 1/2 tsp vanilla extract
I like to make the chia seed jam in advance so I can refrigerate it; and it can thicken & set overnight. I tried this recipe with freshly made jam and it also worked. But If the jam had set, it would be even better! Remember this jam is pectin and cornstarch free and we use chia seeds as a binder.
For the Jam
Place the 2 cups of rinsed berriess in a pot over medium heat. Mash them up with a large fork, spoon or potato masher. They need to get sirupy and disintegrate.
Squeeze the 1 tbsp of lemon juice to bring out their flavor, add the maple syrup and pure vanilla extract. Stir well and cook for about 3 minutes over low heat. Add the 2 tbsp of chia seed and stir well again. Cook for another 5 minutes in medium to low heat. Turn it off and allow it to cool & thicken for at least 5-10 minutes.
Instructions (For the Cookies)
- Turn your oven on to 350F and line a baking sheet with parchment paper
- In a medium bowl, cream (blend/whisk) together: the melted coconut oil, vanilla and almond extracts, and pure maple syrup.
- Slowly add/incorporate the almond flour and sea salt. Mix well until it feels like play-doh. Form donut-hole sized balls. Then use your thumb to press down on the center and create a hole or dent to hold the jam.
- Use a small teaspoon to drop the jam right in the middle. Bake for about 10-12 minutes, or until the edges start to turn slightly golden. Allow them to cool and then transfer to a cookie rack to cool completely.
- Pro-tip: you may want to add a jam touch-up post-baking. Just a little glaze.
- ENJOY them!
Happy baking! xx
By: Aleyda | The Dish On Healthy

Leave a Reply